
Using cast iron on induction cooktops is not only safe but highly effective — cast iron is, in fact, one of the most compatible cookware materials for induction technology, thanks to its naturally ferrous (iron-containing) composition that responds powerfully to electromagnetic fields. Unlike aluminum, copper, or ceramic, cast iron requires no special coating or bonded base to work on induction. The result is a cooking combination that delivers fast, responsive heating alongside legendary heat retention — a pairing that serious home cooks increasingly rely on for everything from searing steaks to slow-simmering stews. For a complete overview, see induction cookware complete guide.
That said, using cast iron on induction does come with important safety and handling considerations that differ from gas or electric cooktops. Induction heats cookware significantly faster than traditional methods, which means cast iron — already prone to thermal stress — must be preheated slowly and deliberately. Beyond temperature management, the weight and rough-bottomed texture of cast iron pose real risks to the ceramic glass surface of induction cooktops if handled incorrectly.
Performance-wise, getting the most out of cast iron on induction depends on understanding how flat bottom contact, burner-to-pan size matching, and cooking technique interact. Cast iron’s exceptional heat retention becomes a strategic advantage on induction, where precise temperature control is possible — but only when you know how to manage both the pan and the burner settings together.
After mastering safe usage, the next frontier is proper maintenance — because induction’s rapid, concentrated heat cycles can affect the seasoning layer of bare cast iron over time. From post-cook cleaning to re-seasoning, a targeted maintenance routine keeps your cast iron performing flawlessly session after session. Below, this guide walks you through every stage: compatibility, safety, performance, and maintenance.
Is Cast Iron Safe to Use on an Induction Cooktop?
Yes, cast iron is completely safe to use on an induction cooktop — and for at least three compelling reasons: it is naturally magnetic, it heats efficiently through electromagnetic energy, and both bare and enameled versions are fully compatible without modification.
To understand why this combination works so well, it helps to look at the science behind induction cooking itself. Specifically, the reason cast iron is so well-suited comes down to the physics of how induction generates heat in the first place.
How to check if cookware is induction compatibleHow Does Induction Cooking Work with Cast Iron?
Induction cooking works by passing an alternating electrical current through a copper coil located directly beneath the ceramic glass surface of the cooktop. This current generates a rapidly oscillating magnetic field that, when it encounters a ferromagnetic material — one containing iron — induces electrical eddy currents within the metal itself. These eddy currents produce resistance, and that resistance generates heat directly inside the pan, not in the cooktop surface.
Cast iron is one of the most ferromagnetic materials available in everyday cookware. Because iron atoms align strongly with magnetic fields, cast iron absorbs electromagnetic energy with exceptional efficiency, allowing it to heat up quickly and evenly across the cooking surface. Unlike aluminum or copper — which are non-ferrous and will not respond to induction fields unless they have a bonded steel base — cast iron needs no modification whatsoever.
This is also why induction is technically more energy-efficient than gas or electric coil cooking: nearly all the generated energy transfers directly into the pan, with little wasted as ambient heat. According to the U.S. Department of Energy, induction cooktops transfer roughly 84% of their energy to the food being cooked, compared to about 74% for electric and just 40% for gas — a gap that cast iron, with its strong magnetic response, helps maximize.
Induction cooktop noise buzzing humming FAQDoes the Magnet Test Confirm Cast Iron Works on Induction?
Yes — the magnet test is a reliable, simple method to confirm induction compatibility, and cast iron passes it without exception. The test works as follows: hold a standard refrigerator magnet against the bottom of the pan. If the magnet clings firmly and resists being pulled away, the cookware is ferromagnetic and will work on induction. If it slides off or barely clings, the pan is not compatible.
Cast iron — whether bare, pre-seasoned, or enameled — always passes this test because its iron content is inherently high. In contrast, pure aluminum, ceramic, glass, and most copper pans fail the magnet test and require a specially bonded magnetic base to function on induction. When shopping for cast iron specifically, the magnet test is largely unnecessary given its universal compatibility, but it remains a useful habit when evaluating any unfamiliar piece of cookware for induction use.
What Are the Safety Rules for Using Cast Iron on an Induction Cooktop?
There are four core safety rules for using cast iron on an induction cooktop: always lift rather than slide the pan, place it gently and centered on the heating zone, inspect the base before cooking, and manage heat settings carefully to prevent glass surface damage.
These rules exist for an important reason. While cast iron and induction are compatible, the physical characteristics of cast iron — its significant weight, its textured or rough base, and its slow thermal equalization — create specific risks for the delicate ceramic glass surface of induction cooktops that differ from risks posed by lighter stainless steel or nonstick pans. Understanding each rule in context makes them easier to apply consistently.
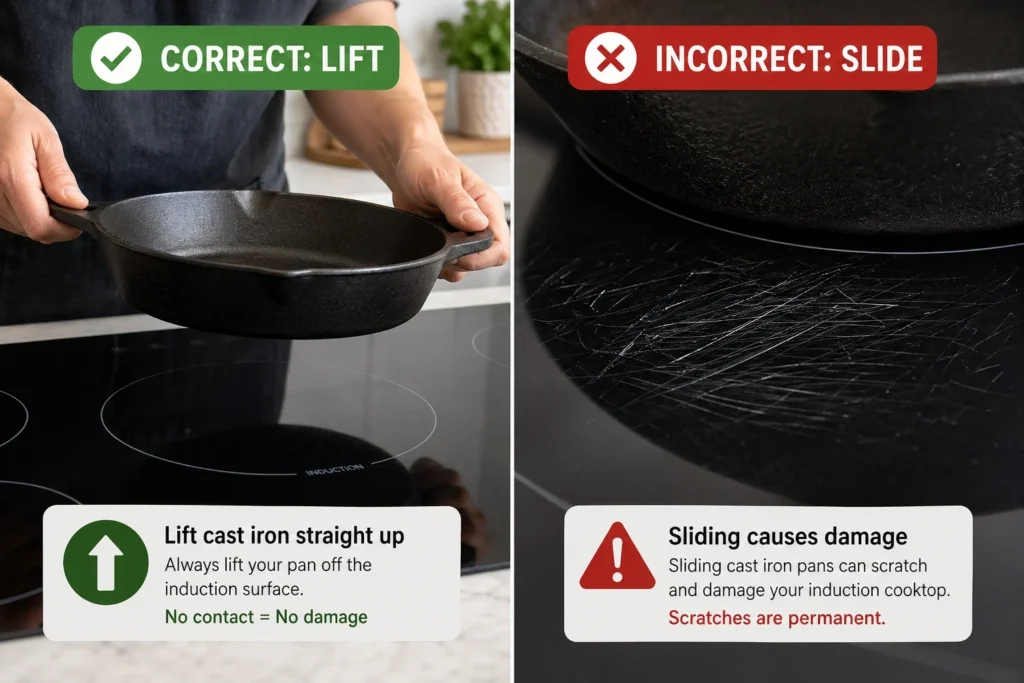
How to Place and Move Cast Iron on an Induction Cooktop Without Scratching
The number one cause of induction cooktop surface damage from cast iron is dragging or sliding the pan across the glass — a habit that feels harmless but creates micro-abrasions that accumulate over time into visible scratches and, in severe cases, surface cracks.
Follow these four handling rules every time you use cast iron on induction:
- Always lift, never slide. No matter how small the adjustment, pick the pan fully off the surface before repositioning it. Even a half-inch slide with a rough-bottomed cast iron skillet can leave a mark on ceramic glass.
- Place the pan gently and centered. Lower the cast iron slowly onto the heating zone, centering it as accurately as possible over the induction coil. A misaligned pan not only risks edge-dragging during cooking but also reduces heating efficiency.
- Inspect the base before every use. Turn the pan over and check the bottom for food residue, grit, or debris. Even a small piece of dried food trapped between cast iron and glass can act like sandpaper under the weight of the pan. Wipe the base with a dry cloth before placing it on the cooktop.
- Consider an induction cooktop liner or silicone mat. These thin, heat-resistant mats sit between the pan and the glass surface, providing a protective buffer without meaningfully affecting heat transfer. They are particularly useful for bare cast iron with a rougher exterior texture.
What Temperature Settings Should You Use for Cast Iron on Induction?
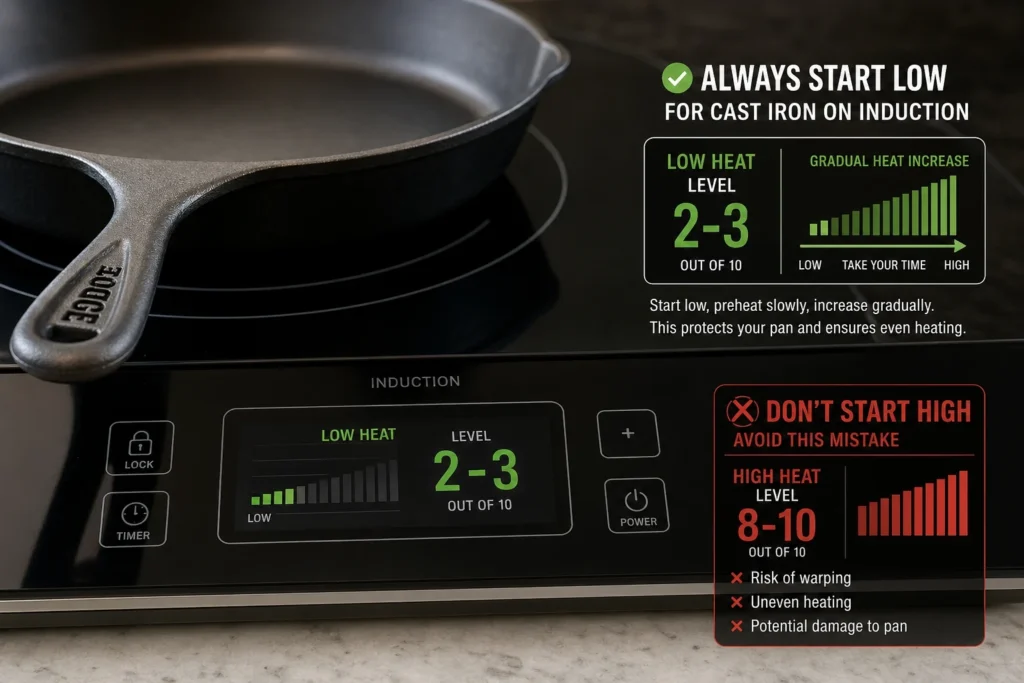
The most important temperature rule for cast iron on induction is this: always start low and increase gradually — never begin at high heat, regardless of how quickly you want the pan to reach cooking temperature.
This rule addresses a risk unique to induction: the cooktop can raise pan temperature far faster than gas or electric burners. Cast iron, despite its durability, has a relatively low thermal conductivity compared to aluminum or stainless steel, meaning heat does not spread evenly through the metal as quickly as it is generated. If an induction cooktop pushes high electromagnetic energy into a cold cast iron pan, the area directly above the coil can become extremely hot before the rest of the pan has had time to equalize — creating significant thermal stress.
In practice, the recommended preheat protocol is:
- Set the induction burner to low (typically setting 2–3 on a 1–10 scale).
- Allow the cast iron to warm for 2–3 minutes until it feels warm to hold your hand a few inches above.
- Increase to medium (setting 4–6) and wait another 1–2 minutes.
- Only move to medium-high or high (setting 7–9) for tasks like searing — and do so only after the pan has stabilized at medium for a full minute.
One additional note on heat management: cast iron retains heat so effectively that once it reaches your target cooking temperature, you can almost always reduce the induction setting by 1–2 levels and maintain that temperature without dropping. This saves energy and reduces the risk of overheating, which is especially relevant on high-powered induction units rated at 1800W or above.
How Do You Maximize Cast Iron Performance on an Induction Cooktop?
Maximizing cast iron performance on induction comes down to three factors: ensuring full flat-bottom contact with the heating zone, matching pan size to burner size, and selecting the right cooking technique for the task — each of which unlocks a specific performance advantage.
The potential of this combination is genuinely impressive. Induction’s precision temperature control, paired with cast iron’s unrivaled heat retention, creates a cooking environment where temperatures remain stable even after cold ingredients are added — a key advantage for searing, where surface temperature consistency directly determines crust quality.
Why Does Flat Bottom Contact Matter for Cast Iron on Induction?
Flat bottom contact matters because induction transfers heat only through direct magnetic interaction — and only where the pan’s base physically aligns with the coil beneath the glass. Unlike gas, where flames wrap around the sides of a pan, induction heat generation is strictly localized to the contact footprint between cooktop and cookware.
A cast iron pan with a warped or uneven base creates two problems simultaneously: first, the sections of the base not in contact with the glass do not heat at all, resulting in uneven cooking temperatures across the pan surface. Second, the points of concentrated contact between a warped pan and flat glass experience elevated localized pressure, increasing scratch and crack risk.
To check whether your cast iron has a flat base, place it on any flat, level surface and look for rocking or gaps beneath the rim. New cast iron from quality manufacturers is consistently flat. Older pieces or lower-cost cast iron can develop warping through repeated heating and cooling cycles. If your pan rocks noticeably, consider investing in a replacement — performance on induction will be meaningfully compromised.
When purchasing cast iron specifically for induction use, look for pans described as having a machine-milled or precision-ground base. Brands like Skeppshult and Field Company specifically machine their bottoms for maximum flatness, which pays dividends in both heating efficiency and glass surface protection.
How to Match Burner Size to Cast Iron Pan Size for Best Results
The general principle is straightforward: match the diameter of your cast iron pan’s base as closely as possible to the diameter of the induction heating zone.
Here is how size mismatches affect performance:
| Scenario | Effect on Heating | Effect on Safety |
|---|---|---|
| Pan base = Burner zone | Even, efficient heating across full pan surface | Optimal — no edge overlap risk |
| Pan base smaller than burner | Energy wasted; magnetic field extends beyond pan | No safety issue, but inefficient |
| Pan base larger than burner | Center heats; edges remain cooler | Risk of uneven cooking and hot spots |
This table summarizes how the spatial relationship between your cast iron pan’s base and the induction heating zone affects both cooking performance and energy efficiency — a mismatch in either direction reduces results.
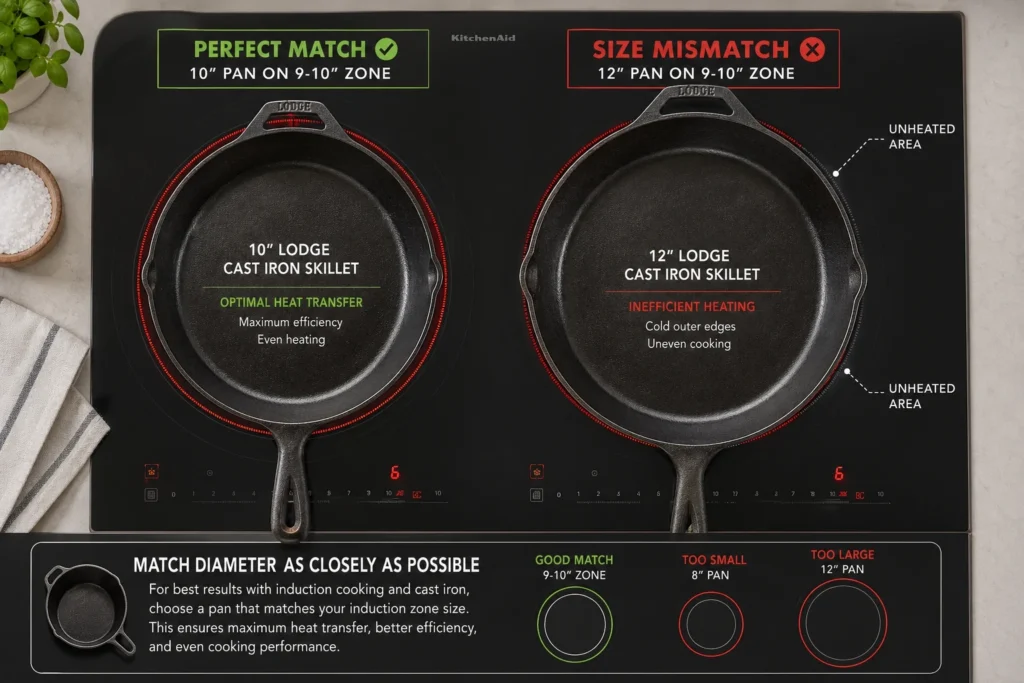
Most induction cooktops have heating zones ranging from 6 to 11 inches in diameter. A 10-inch cast iron skillet pairs well with a standard 9–10 inch zone. A 12-inch skillet may overhang a smaller zone, leaving the outer inch of the pan significantly cooler — which matters when searing a large steak or frying items near the edges.
What Cooking Techniques Work Best with Cast Iron on Induction?
Cast iron on induction excels across four primary cooking techniques — searing, frying, slow cooking, and stovetop-to-oven transitions — each benefiting from the combination in a distinct way.
Searing is where this pairing truly shines. Preheat the cast iron slowly to medium, then raise to medium-high just before adding protein. The pan’s thermal mass holds temperature when cold meat hits the surface — the enemy of a good sear is temperature drop, and cast iron resists it better than any other material. Induction’s responsive controls mean you can dial back quickly after the initial sear without fighting residual burner heat.
Frying benefits from cast iron’s ability to maintain a stable oil temperature even as food is added in batches. Set induction to medium, allow the oil to reach target temperature (typically 325–375°F depending on the recipe), and trust the cast iron to buffer minor temperature swings. Avoid increasing induction power dramatically between batches — cast iron needs only a minute to recover.
Slow cooking on induction with cast iron requires less power than most home cooks expect. The low setting (1–2 on most induction units) combined with a lidded cast iron Dutch oven creates a self-sustaining heat environment where the pan retains enough energy to continue cooking with minimal energy input. This is one of the most energy-efficient cooking configurations available in a home kitchen.
Stovetop-to-oven transitions highlight a unique advantage of cast iron: it is fully oven-safe at any temperature your home oven can produce. Start a braise or sear on induction, then transfer the entire pan directly to the oven without changing cookware — a seamless workflow that no nonstick or plastic-handled alternative can replicate.
Best induction cookware setsHow Do You Maintain Cast Iron After Using It on an Induction Cooktop?
Maintaining cast iron after induction cooking requires two focused practices: a proper post-cook cleaning routine that preserves the seasoning layer, and periodic re-seasoning when the surface shows signs of wear — both of which differ slightly in approach from maintenance after gas or electric use.
Induction’s concentrated, rapid heating can stress the polymerized oil layer that forms cast iron’s nonstick seasoning more intensely than the slower, ambient heat of gas burners. Over time, without deliberate care, this can result in a dull, sticky, or uneven surface that diminishes cooking performance. The good news is that a consistent five-minute post-cook routine prevents the vast majority of seasoning degradation.
How to Clean Cast Iron After Induction Cooking Without Damaging the Seasoning
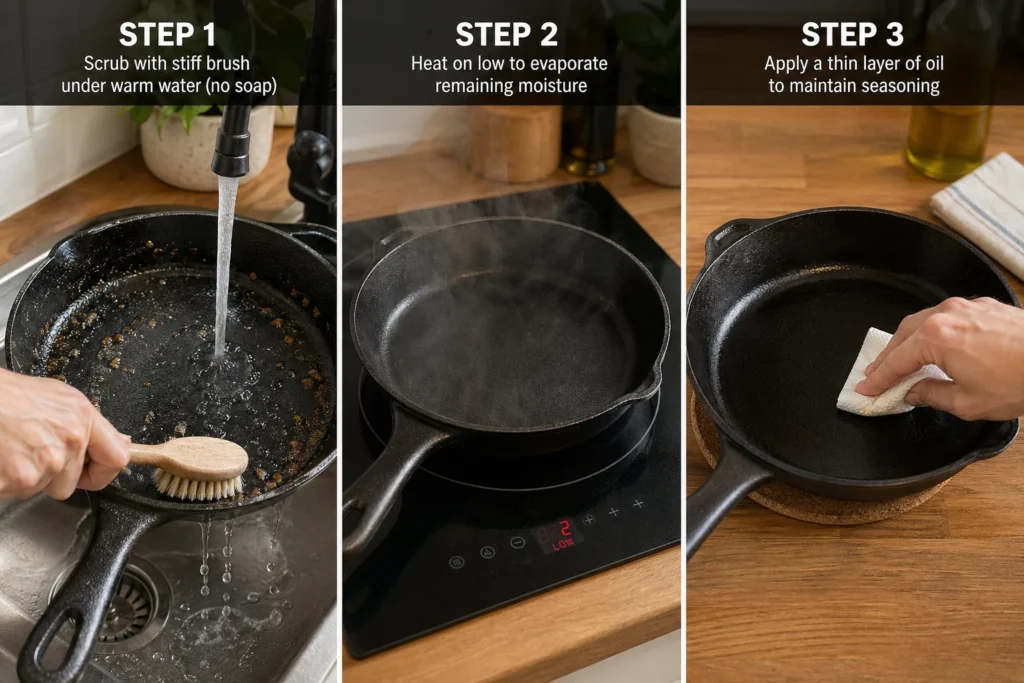
The cleaning process for cast iron after induction use follows a clear sequence designed to remove food residue while protecting the polymerized oil layer that forms its natural nonstick surface:
- Allow the pan to cool naturally. Never run cold water over hot cast iron — the sudden temperature contrast can cause thermal shock, which in cast iron manifests as micro-fractures or, in severe cases, visible cracks. Allow the pan to cool on the induction surface (turned off) or on a heat-safe trivet for at least 10–15 minutes before cleaning.
- Rinse with warm water and a stiff brush. A Lodge-style scrub brush or chain mail scrubber removes stuck food effectively without stripping seasoning. For stubborn residue, add a small amount of coarse kosher salt and scrub with a paper towel — the salt acts as an abrasive without chemically attacking the seasoning.
- Avoid dish soap with high alkaline content for routine cleaning. A small amount of mild dish soap used occasionally will not destroy a well-established seasoning layer, but frequent use of strong detergents strips the oil coating over time. For most routine cleanups, warm water and a brush are sufficient.
- Dry thoroughly and immediately. Cast iron rusts faster than almost any other cookware material. After rinsing, place the pan back on the induction cooktop on the lowest setting for 1–2 minutes to evaporate all surface moisture completely.
- Apply a micro-thin coat of oil. While the pan is still warm from drying, wipe a very small amount of neutral oil — flaxseed, canola, or vegetable — onto the cooking surface with a paper towel. Wipe away almost all of it; the goal is a barely visible sheen, not a greasy coating.
For enameled cast iron (Le Creuset, Staub, Lodge Enameled), the process is simpler: the enamel coating does not require seasoning or oil maintenance. Wash with warm soapy water, rinse, and dry. Avoid metal scourers that can chip the enamel surface.
How to Re-Season Cast Iron That Has Been Used on an Induction Cooktop
Re-seasoning becomes necessary when the cast iron surface shows specific warning signs: food sticks more than usual, the surface appears dull gray or patchy rather than a uniform dark sheen, or rust spots appear after cleaning.
Induction use can accelerate the need for re-seasoning compared to gas cooking because the rapid, localized heat concentrates thermal energy in the base of the pan — where seasoning is thinnest — more intensely than the distributed heat of a gas flame. The process to restore the surface is straightforward:
- Wash thoroughly with hot water and a scrub brush to remove all existing food residue. If rust is present, use fine steel wool to remove it completely, then wash again.
- Dry completely on the induction cooktop at low heat for 2 minutes, or in an oven at 200°F for 10 minutes.
- Apply a thin, even coat of high-smoke-point oil — flaxseed oil (smoke point ~225°F) builds the hardest seasoning layer through polymerization; canola or vegetable oil are practical alternatives. Use a paper towel to coat the entire surface, inside and out, then wipe away almost all of it.
- Place the pan upside-down in an oven preheated to 450–500°F and bake for one hour. Place a sheet of aluminum foil on the rack below to catch any oil drips.
- Allow to cool in the oven. Remove and inspect: the surface should appear slightly darker and feel smooth rather than tacky. Repeat 2–3 times for a new or heavily stripped pan.
One advantage induction provides during the re-seasoning process itself: its precise temperature control allows you to heat the pan on the cooktop at an exact temperature before applying oil for the stovetop seasoning method — a useful technique for quick touch-up seasoning between full oven cycles.
What Are the Common Problems When Using Cast Iron on Induction — and How to Fix Them?
The most common problems when using cast iron on induction — uneven heating, thermal cracking, surface scratching, and accelerated seasoning wear — all have clear, preventable causes and practical solutions that home cooks can implement immediately.
Understanding these failure modes turns troubleshooting from guesswork into diagnosis. Each symptom points to a specific root cause, and addressing that cause eliminates the problem at its source rather than masking the symptom.
Why Is My Cast Iron Not Heating Evenly on an Induction Cooktop?
Uneven heating in cast iron on induction has three primary causes: a warped or non-flat base, a significant size mismatch between pan and heating zone, or preheating too rapidly for heat to distribute through the pan’s thermal mass.
Warped base is the most common culprit. If your pan rocks on a flat surface, the sections of the base not in contact with the glass receive no electromagnetic energy — creating cold spots that correspond exactly to the air gaps. Solution: replace the pan or use it on gas/electric where heat distribution is less dependent on direct contact.
Size mismatch creates a characteristic heating pattern: the center of the pan, positioned directly above the coil, reaches target temperature while the edges lag behind. This is especially noticeable in a 12-inch skillet placed on a 6-inch induction zone. Solution: match pan size to zone diameter, or choose a larger induction unit with a wider heating zone.
Rapid preheating causes the area above the coil to overheat before cast iron’s relatively low thermal conductivity has had time to spread heat toward the edges. The fix is simply the preheat protocol described earlier: start low, increase slowly, allow 2–3 minutes at each stage before raising the setting.
Can Cast Iron Warp or Crack from Induction Heat — and How to Prevent It?
Cast iron can crack from induction heat under specific conditions — primarily rapid temperature change (thermal shock) — though warping is far less common given cast iron’s thickness. The risk is real but entirely preventable with consistent habits.
Thermal shock occurs when a significant temperature differential develops across the mass of the cast iron faster than the metal can equalize. On induction, this risk is higher than on gas because the electromagnetic field can deliver energy to the pan base almost instantaneously. A cold cast iron pan placed on a high induction setting and left unattended can develop extreme temperature differentials between the base (above the coil) and the walls of the pan within minutes.
Prevention requires three non-negotiable habits:
- Never preheat on high. Always begin at low and increase gradually, as outlined in the temperature settings section above.
- Never cool rapidly with cold water. After cooking, allow the pan to cool naturally for at least 10–15 minutes before any contact with water.
- Never place a cold pan directly on a hot induction surface. If you have removed the pan and the cooktop is still warm, either allow both to cool or place a silicone mat between them.
Older cast iron pieces with existing micro-cracks (often invisible to the naked eye) are at elevated risk. If you own antique or heavily used cast iron, the slow preheat protocol becomes even more critical.
Is Cast Iron Better or Worse Than Carbon Steel for Induction Cooking?
Cast iron excels over carbon steel in heat retention, price accessibility, and slow cooking performance; carbon steel surpasses cast iron in heating speed, weight, and maneuverability — making the better choice entirely dependent on your cooking style.
The following table compares cast iron and carbon steel across five key performance criteria relevant to induction cooking, helping home cooks identify which material better matches their specific needs:
| Criteria | Cast Iron | Carbon Steel | Winner |
|---|---|---|---|
| Heat retention | Exceptional — holds temperature through cold-food additions | Good — loses heat faster when loaded | Cast Iron |
| Heating speed | Slower — thick walls take longer to equalize | Faster — thinner walls respond quickly | Carbon Steel |
| Weight | Heavy (10″ skillet: ~5–8 lbs) | Lighter (10″ pan: ~3–4 lbs) | Carbon Steel |
| Seasoning complexity | Moderate — requires patience, less frequent maintenance | Similar — more frequent re-seasoning needed | Tie |
| Price (entry level) | Lower — Lodge 10″ from ~$30 | Higher — de Buyer from ~$50+ | Cast Iron |
This comparison table highlights that cast iron is the stronger choice for tasks where temperature stability matters most — searing large cuts of meat, deep frying, and slow braising — while carbon steel serves better for quick sautéing, stir-frying, and applications where pan weight affects technique.
Best carbon steel cookware for induction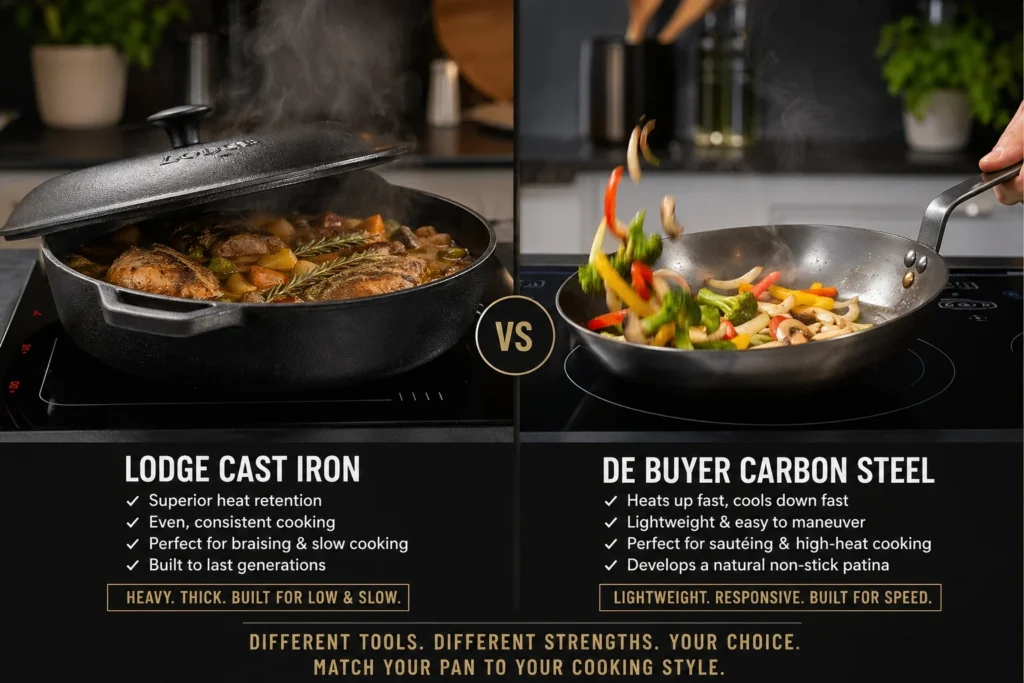
Does Using Cast Iron on Induction Affect the Cooktop’s Lifespan?
Using cast iron on induction does not inherently shorten a cooktop’s lifespan — modern induction surfaces are engineered from hardened ceramic glass designed to withstand the weight and heat of cast iron — provided the pan is handled correctly and the glass is maintained properly.
The real threat to induction cooktop longevity is not the weight or magnetic interaction of cast iron, but the accumulated effect of surface scratches created by improper handling. Each scratch, while minor individually, creates a weak point in the ceramic glass surface where stress can concentrate. Over years of use, a heavily scratched surface becomes more vulnerable to cracking under thermal or mechanical stress.
Two maintenance practices protect your induction cooktop long-term when used regularly with cast iron:
Clean the cooktop surface after every use. Any residue — oil splatter, food debris, mineral deposits from water — that dries onto the glass and is then contacted by a cast iron base during the next cooking session becomes an abrasive intermediary. A quick wipe with a damp cloth after the surface cools eliminates this risk entirely.
Use an induction cooktop liner or silicone mat if you cook with cast iron daily. These thin, heat-safe mats (rated to 500°F or higher) sit between the pan and the glass, providing a sacrificial buffer that absorbs micro-abrasions that would otherwise reach the cooktop surface. The magnetic field passes through them without meaningful energy loss, and they are inexpensive to replace annually.
Taken together, these practices ensure that your induction cooktop and cast iron cookware coexist productively for many years — each making the other more effective rather than causing degradation.